INF StartGame done, players can join from the server browser or with your server address and port 26900.
Before you start
- Log in to the Game Panel.
- Have 7 Days to Die on your PC on the same version as the server (the default Steam branch).
- Stop the server before you change the world or save name.
How to set up your 7 Days to Die server
1
Open Game settings
Open your server and click Game settings under GAME SETTINGS. The page edits
serverconfig.xml for you. Its subtitle reminds you that changes need a restart and that world settings only apply to a new save.2
Name your server
In the Server section, enter a Server name and a Server description. Both show in the server browser.
3
Set a password (optional)
Click Set next to Server password and enter one. Leave it empty for an open server.
4
Choose visibility and region
Leave Visibility on Public to be listed in the browser. Pick the Region closest to your server and players.
5
Choose the world
In World and save, leave World on
Navezgane for the hand-made map, or enter RWG for a random world. Save name is the name of your save. A new save name starts a new, empty save.6
Set the game rules
Since V3.0, difficulty, XP, loot, blood moons and zombies come from the sandbox code. Paste a code into Difficulty code (sandbox) or keep the default. See sandbox code.
7
Review, save and start
Click Review and save, check the changes and confirm. Then start the server.
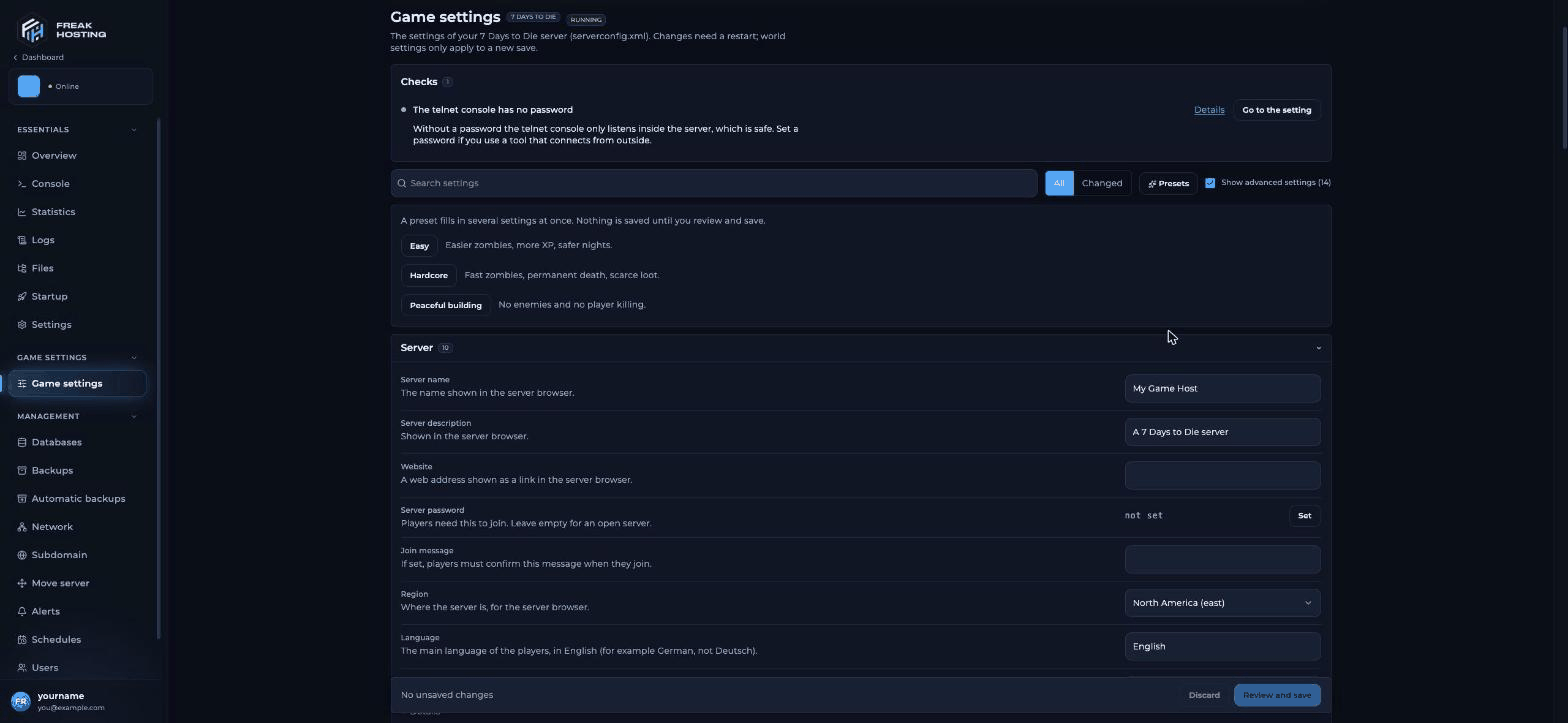
Game settings for 7 Days to Die in the FREAKHOSTING Game Panel
How to know your server is ready
The panel Console connects to the server’s telnet console once the game has booted, so it shows nothing for the first moments. A first start takes around half a minute. The server is ready when you see:RWG) world takes longer the first time because the server generates it. The full start-up log is in logs/latest.log; see read server logs.
How to join your 7 Days to Die server
Enter the server password when asked. If you can’t find the server, see server not showing.
Make your first backup
When your world is running, make a panel backup. Your save lives in.local/share/7DaysToDie/Saves/, together with serveradmin.xml, so a backup keeps both.
Frequently asked questions
What port does a 7 Days to Die server use?
The game port is 26900. Your server also has ports 26901 and 26902 and the telnet port 8081. Players only need the address and port 26900.How many players can join?
The Player slots setting shows your limit. It is fixed by your hosting plan.How do I become admin on my server?
Join the server, then typeadmin add <your name> 0 in the panel Console. See add an admin.
Why did my world reset after I changed a setting?
You probably changed Save name or World. A new name starts a different save; the old one stays on disk. Change the name back and restart to load it again.Related guides
7 Days to Die server guide
Every 7 Days to Die page in one place.
serverconfig.xml and Game settings
What every section does.
Sandbox code
Difficulty and game rules.
Add an admin
Give yourself admin rights.
Not showing in the list
Find your server.
Tested by the FREAKHOSTING team on our Game Panel on 31 October 2026 (7 Days to Die V3.4.0 b9). Steps may differ slightly if the game changes.
Need Extra Help?
If you encounter any issues, our support team is ready to assist:- Live Chat: Quick assistance via our website.
- Support Ticket: Open a Ticket
- Discord: Join our Community
- Email: support@freakhosting.com
Last Updated: October 2026